Recently I had a customer who wanted to use Azure IoT Edge for IIoT and wanted to restrict network traffic to and from their Azure services.
Being that IoT could have such an impact on their factory systems, this concern is a common one. Needing layers of network separation is common in IIoT and is the foundation for the “nested IoT Edge” feature in private preview: https://azure.microsoft.com/en-gb/updates/iot-edge-nested-edge/.
More than just network layers, this customer wanted complete lockdown, something commonly requested yet often not common in PaaS or public cloud offerings. For Azure, Private Link (https://azure.microsoft.com/en-us/services/private-link/) is the answer, and the main IoT services: Hub, DPS, Container Services and Storage all support Private Link.
Private Link, when combined with either Site to Site VPN or Express Route enable the full encryption and protection of traffic flowing to and from your on premises (factory network in my case) and Azure, as the diagram below shows:
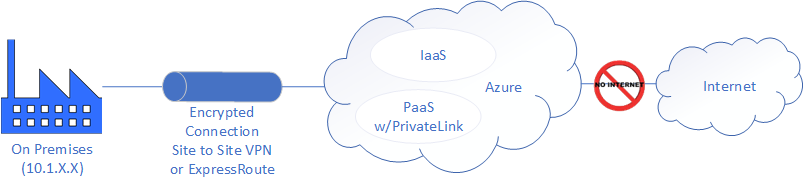
Note that there is no Internet traffic permitted or connectivity in this architecture.
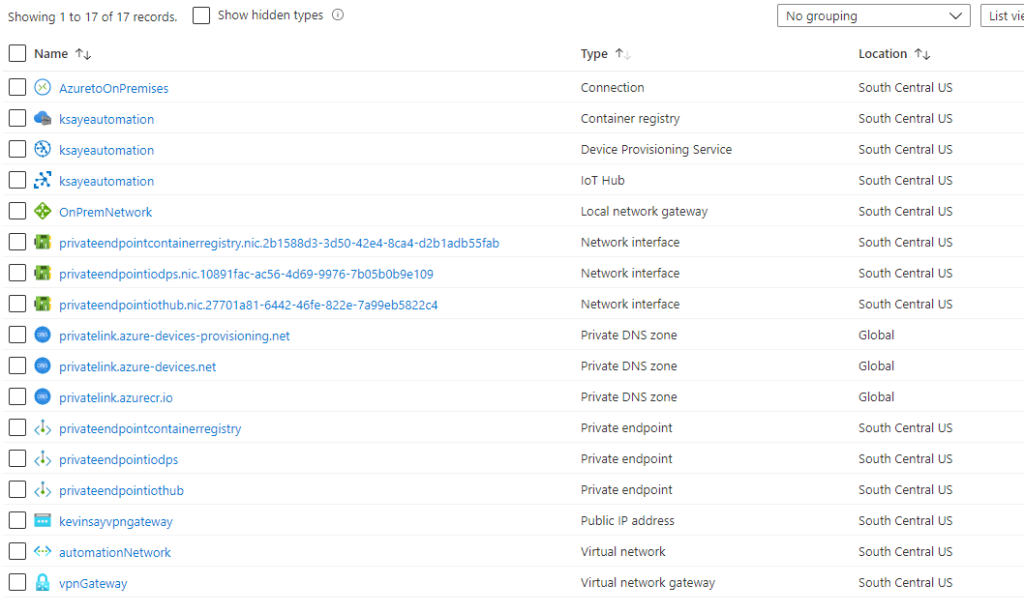
Building out the full architecture for IoT, we see that the associated PaaS services all support Private Link and we also add Azure Private DNS Zones and a DNS server for name resolution, as shown below:

Viewing the required services in Azure, we see a lot of objects, which I will walk through the setup next:
Overview of Setup:
- Create the Azure Virtual Network and connect the Virtual Network to ExpressRoute or Site to Site VPN: https://docs.microsoft.com/en-us/azure/vpn-gateway/vpn-gateway-howto-site-to-site-resource-manager-portal
- Create the IoT Hub, DPS and Container Registry and configure for Private Endpoints and disable Public Access
- [Optional] (for on Premises DNS resolution) Setup a VM and enable DNS (bind9 in my example) and remote name resolution (disabled by default in bind9)
- Enable any firewall rules needed for remote support staff or ‘Data Consumers’ that will read data from IoT Hub
- Publish the edgeAgent, edgeHub and any custom modules from mcr.microsoft.com to your Container Registry
- Setup IoT Edge on Premises and test
Note, since this document was originally published, step 3 above is now optional with the introduction of Azure DNS Private Resolver: https://learn.microsoft.com/en-us/azure/dns/dns-private-resolver-overview.
Create IoT Services and Configure for Private Endpoints:
- In http://portal.azure.com, create an IoT Hub
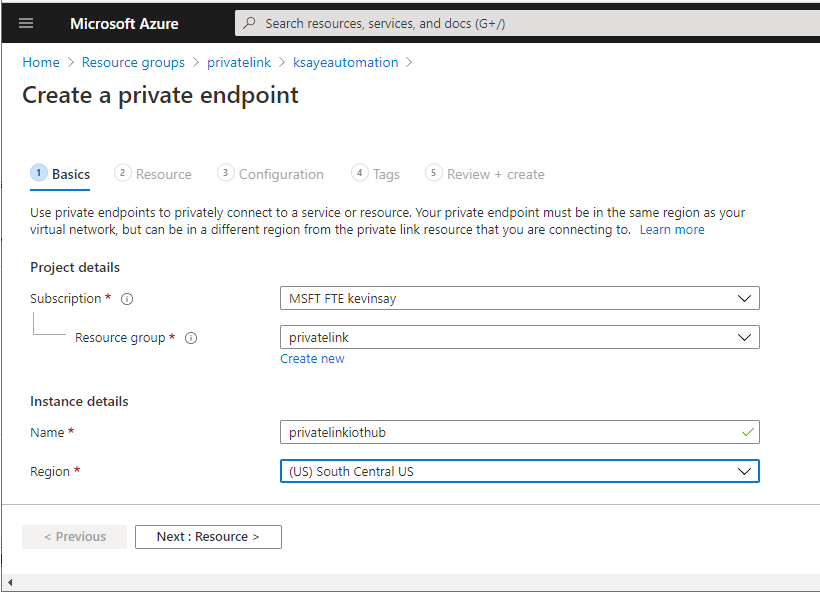
- On the IoT Hub, select Networking –> Private Endpoint Connections and click “+ Private endpoint”.

3. Select the resource group, Name the connection and select the region you deployed the network and IoT Hub in:
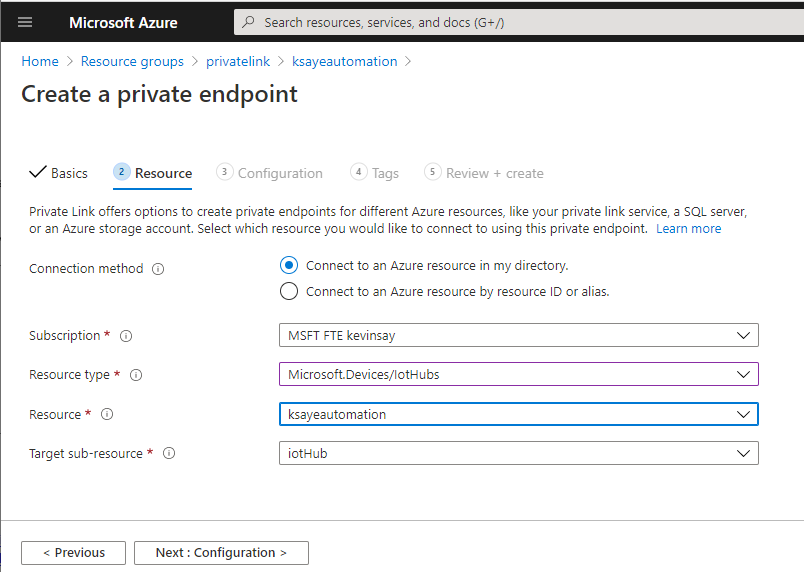
4. Select resource type “Microsoft.Devices/IoTHubs” and the Resource name of your IoT Hub.
5. Select the Virtual Network, Subnet and select “Integrate with private DNS Zone” and select Review + create.

6. Next back at the IoT Hub, select Networking –> Public access –> Disabled and Save the changes.

7. Repeat these steps for Device Provisioning Service and Azure Container Registry. Note, the Azure Container Registry should be SKU Premium to support a Private Endpoint.
[Optional] Setup VM for DNS Resolution:
Note, this is now optional with the introduction of Azure DNS Private Resolver: https://learn.microsoft.com/en-us/azure/dns/dns-private-resolver-overview
- In http://portal.azure.com, create an Ubuntu 18.04 VM on the existing Virtual Network.
- SSH into the VM and install bind9 by running the following command
sudo apt update && sudo apt install bind9
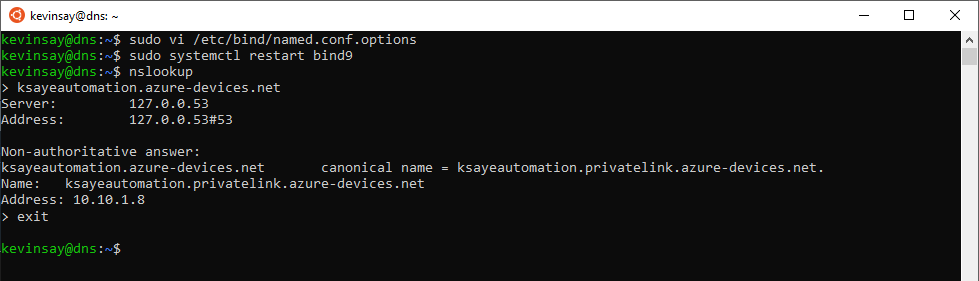
3. Edit the /etc/bind/named.conf.options file, as shown below:

4. Run the following command to restart the dns service and verify the setup using nslookup, as shown below. Note how my IoT Hub was a CNAME which resolved to an ip address of 10.10.1.8.
sudo systemctl restart bind9
On a remote machine (on Premises) I can also verify that it can make a remote DNS request and still resolve the same name to the internal IP Address:

Publish modules to the Private Container Registry:
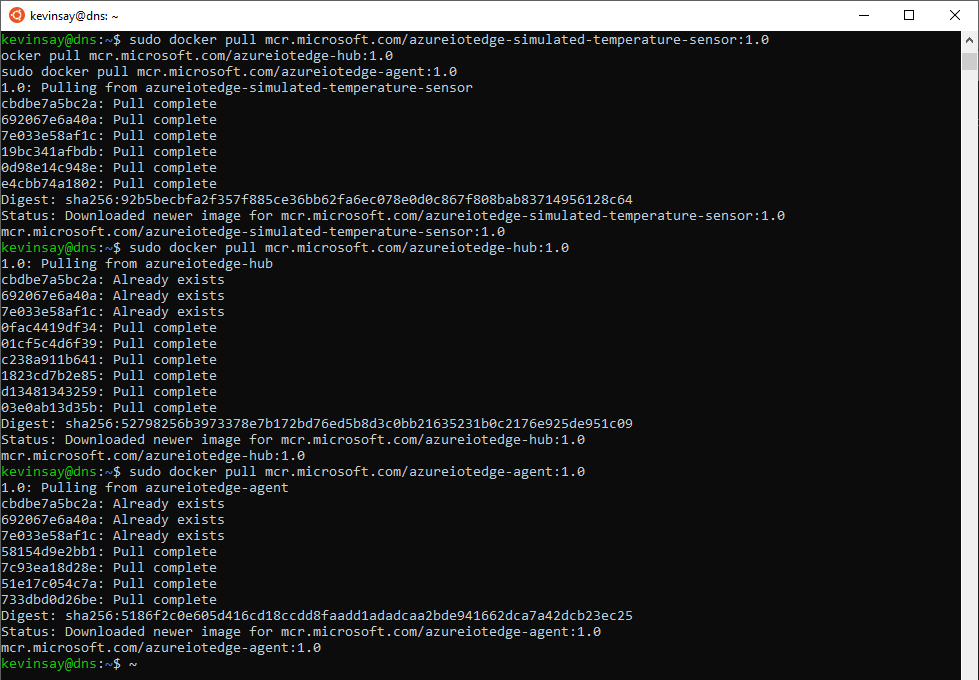
Because our IoT Edge will not have access to the Internet, we need to take the system modules edgeAgent and edgeHub and pull them from mcr.microsoft.com and push them to our private Container Registry. I will also pull SimulatedTemperatureSensor, as it is a good demonstration module.
If you have restricted public access to your Container Registry and are accessing it from the public, you will get a Forbidden error shown below. To address this, enable public access for your IP address or perform these steps on the DNS Server or IoT Edge device, which is in the allowed network.

- Log into your Private Registry, using the docker command, replacing your userid, key and logon server shown below:

2. Run the following commands to ‘pull’ the required containers:
sudo docker pull mcr.microsoft.com/azureiotedge-simulated-temperature-sensor:1.0
sudo docker pull mcr.microsoft.com/azureiotedge-hub:1.0
sudo docker pull mcr.microsoft.com/azureiotedge-agent:1.0
3. Run the following commands to ‘tag’ the images and ‘push’ to your Registry, replacing the “ksayeautomation” with the name of your Registry:
sudo docker tag mcr.microsoft.com/azureiotedge-simulated-temperature-sensor:1.0 ksayeautomation.azurecr.io/azureiotedge-simulated-temperature-sensor:1.0
sudo docker tag mcr.microsoft.com/azureiotedge-hub:1.0 ksayeautomation.azurecr.io/azureiotedge-hub:1.0
sudo docker tag mcr.microsoft.com/azureiotedge-agent:1.0 ksayeautomation.azurecr.io/azureiotedge-agent:1.0

sudo docker push ksayeautomation.azurecr.io/azureiotedge-simulated-temperature-sensor:1.0
sudo docker push ksayeautomation.azurecr.io/azureiotedge-hub:1.0
sudo docker push ksayeautomation.azurecr.io/azureiotedge-agent:1.0

Setup IoT Edge and test:
If you have restricted access to your IoT Hub and are accessing it from the public, you will get a Forbidden error. To address this, enable public access for your IP address or perform these steps on the DNS Server or IoT Edge device, which is in the allowed network.
- Install IoT Edge for Linux: https://docs.microsoft.com/en-us/azure/iot-edge/how-to-install-iot-edge-linux or for Windows: https://docs.microsoft.com/en-us/azure/iot-edge/how-to-install-iot-edge-windows
- Create an IoT Edge device on your IoT Hub and gather the connection string.
- Deploy the Temperature Sensor to your IoT Edge, using your Image URI ‘******.azurecr.io/azureiotedge-simulated-temperature-sensor:1.0’ and set the runtime settings for edgeAgent and edgeHub to reference your Container Registry as shown below:

4. Add your connection information to the config.yaml, and make the required changes to the edgeAgent section, as shown below:

5. Starting IoT Edge, we now see our private repository images:

Summary:
By setting up IoT Hub, DPS and Container Registry using a “Private Endpoint” and configuring IoT Edge we can leverage the security, encryption and SLA of ExpressRoute or a Site to Site VPN to protect networking traffic and access, often required by IIoT. While more complex than your standard setup, Azure is focused on enabling On-premises to Cloud and solutions such as IIoT.

Hi, I tried to pull the images into my edge device as you are trying to do in step 3 of (Publish modules to the Private Container Registry). However, I get this error: dial tcp: lookup mcr.microsoft.com no such host. Can you please help with this?
LikeLike
That error indicates to me that the machine you are using to pull from mcr.microsoft.com can’t resolve the name. Check your DNS and make sure you can ‘ping mcr.microsoft.com’. While you may see request timed out, it should resolve.
LikeLike
Thanks for your reply! My edge pc has no connection to the Internet at all. I resolved the error by pushing foreign layer, so I was able to pull the agent and hub images. Now I can see the agent under iotedge list. Still I have the following errors when I do iotedge check:
× container on the IoT Edge module network can connect to IoT Hub AMQP port – Error
Container on the nat network could not connect to .azure-devices.net:5671
caused by: docker returned exit code: 1, stderr = One or more errors occurred. (The requested name is valid, but no data of the requested type was found.)
× container on the IoT Edge module network can connect to IoT Hub HTTPS / WebSockets port – Error
Container on the nat network could not connect to .azure-devices.net:443
caused by: docker returned exit code: 1, stderr = One or more errors occurred. (The requested name is valid, but no data of the requested type was found.)
× container on the IoT Edge module network can connect to IoT Hub MQTT port – Error
Container on the nat network could not connect to .azure-devices.net:8883
caused by: docker returned exit code: 1, stderr = One or more errors occurred. (The requested name is valid, but no data of the requested type was found.)
My client does not use the same VM for DNS, so what I did is I mapped the ips they gave me for their iothub and ACR in the hosts file in Windows.
LikeLike